Print Smoothing with Acetone – Part 2
Questions to Address
The questions we wanted to address with our tests included questions that struck us when we first started using the acetone vapour treatment methods including:
Finishing Procedure: How should I treat my part (duration and number of finishing cycles) to get the best finish quality?
- Drying: How long does it take for the parts to dry completely?
- Layer Height: Does it significantly affect the finishing process we need to use?
- Dimensions: How much do they change?
- Bleed: If I have two colours touching each other, will the colour bleed across from one into the other?
- Filament: Does treatment change significantly with filament colour or manufacturer?
Acetone Smoothing: Finishing Procedure
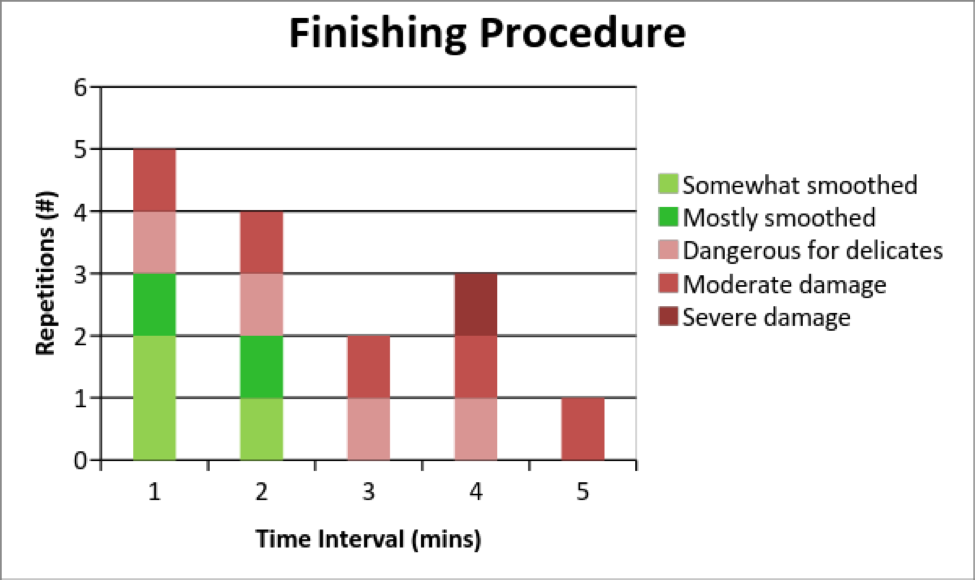
The first thing we wanted to test was how long we should leave a part in the acetone vapour and if it’s better to carry out the treatment with multiple shorter repetitions instead of one long session for more delicate objects. We used three samples for each test: a Ctrl-V test (vers. 1) print as well as a 1 cm3 and a 2cm3 cube. We tested acetone treatment durations of 15, 30, 45, 60 and 120 mins and repeated each treatment until we saw noticeable damage to the sample (testing to destruction – huzzah!). Between each treatment cycle (repetition) the sample was allowed to dry overnight. Depending on the degree of damage visible we graded our results as seen in Figure 1 below.
Using this method, the best results were obtained using 2-3 repetitions of 30 minutes. 3-4 repetitions of 15 minutes can also be used but this is more time consuming due to the drying time in between each treatment repetition and so not worth the extra effort except perhaps with exceptionally delicate 3D prints. However, it is worth noting that the samples used (ctrl-V test version 1, 1 cm3 and 2 cm3 cubes) were already relatively delicate. When working with larger, more robust samples we found that these can take around 1 or 2 repetitions of 1 hour though treatment times of 2 hours straight seemed to be excessive.
Drying Time
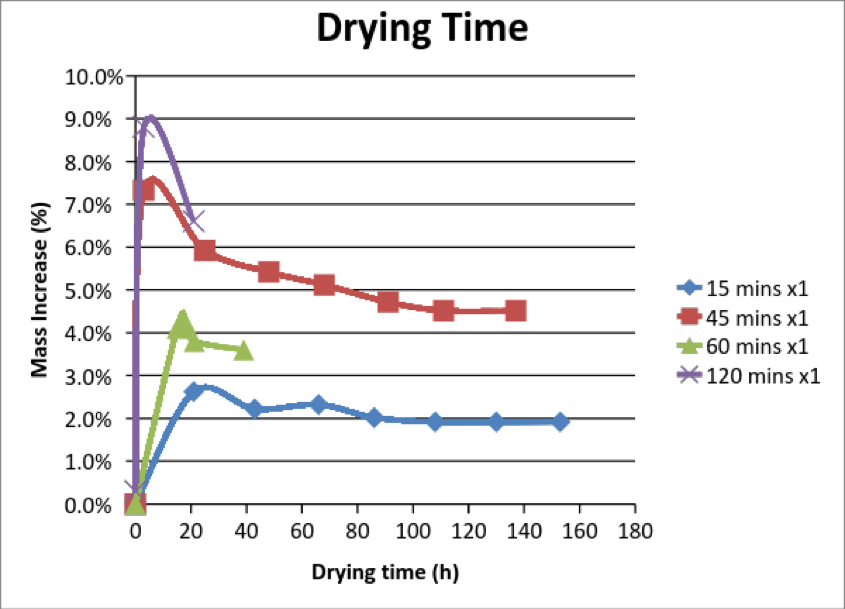
The next factor we tested was how long the acetone would take to dry. We did this by weighing our samples (Ctrl-V test, 1cm3 & 2cm3 cubes) then placing them into the acetone vapour for 15, 30, 45 and 60 minutes then repeatedly measuring the mass of the objects as they dried after treatment. The increase in the mass of the objects that we see here is due to the acetone left in the plastic from treatment. Ideally we’d want to see the plastic dry completely and lose all of this extra mass but what we saw in our data is that some of the acetone seems to remain in the ABS plastic even after 150 hours of drying time! Despite this, the parts were usable and dry to the touch after drying overnight so for practicality we fixed our drying time at 1-2 days, depending on the size of the part.
Layer Height
Another quick test that we did was to check how the layer height would affect the final surface finish quality after treatment and whether it would significantly affect the number of treatments required. We printed the same three sample types in 0.1, 0.2 and 0.3 mm layer height and treated them using the repetitions of 30 minutes treatment method since this provided the best results, as described above.
Since the 0.1 mm layer height provides a smoother surface, we’d expect treatment for these samples to take fewer repetitions or show a smoother surface after the same amount of treatment cycles. Our tests confirmed this with the 0.1 mm samples demonstrating the best surface finish after 3 cycles of 30 minutes, as expected. The 0.2 and 0.3 mm samples, however, were harder to distinguish. Both had comparably good surface finishes after 3 cycles of 30 minutes. In conclusion, the differences seen between these samples was not large enough to warrant a change in our finishing procedure based on the layer height setting.
So far so good…
So, we found that 2-3 repetitions of 30 minutes seemed to provide the best results for small delicate items such as our test samples but in later work we found that more robust samples seemed to be better served by 1 or 2 repetitions of 1 hour treatment. Some acetone seems to remain in the parts even after 150 hours of drying but the parts are typically dry enough for use after drying for 1-2 days, depending on the size of the part. The layer height did not show a significant enough effect on the finish to merit a change in our finishing procedure (duration and treatment repetitions) .
But as we mentioned in beforehand, we also considered the changes in the dimensions, whether two different colours would bleed into one another when finishing as well as starting to check for differences in finish between different filaments.