Print Smoothing with Acetone – Part 1
The current line of FFF/FDM type 3D printer tech at the wider consumer market level (a.k.a. the not-super-expensive level that most of us can afford) still leaves parts with a rough surface. This bumpy, matte surface is created by the stacked layers of plastic themselves and cannot be avoided with the current level of FFF/FDM 3D printing technology. In this article we will investigate how Acetone can be used to avoid this phenomenon.
In many cases this bumpy surface is fine, but sometimes a nice smooth surface finish that most of us have come to expect from plastics is preferable. One thing you can do to achieve this is to finish your parts after printing. There are different finishing methods available e.g. sanding, painting, covering in epoxy glue or using a tumbler or sand blaster to smooth out the parts, but these methods can be rough or time consuming. One simple and convenient method is to use acetone vapour. This essentially dissolves printed part, but only at the surface – if you do it well.
As a scientifically minded bunch, we at Thought3D/Magigoo worked on optimising this finishing process for our parts and want to share what we’ve learnt so far. We will cover our setup, how we carried out the finishing, the tests we used to learn about the finishing process and the effects (such as tolerance changes, best finish and drying times) that this finishing process would have on parts treated in our system.
Our Finishing Setup & Preparations for Testing Acetone Vapor smoothing
Acetone based finishing methods are interesting, because they can be scaled up in volume more easily, provide an even finish even with complicated fiddly shapes and are far less work intensive than alternative methods such as sanding and painting.
One factor we had to consider was whether we would use the cold or hot type acetone vapour finishing methods. Hot acetone works faster but can be more hazardous due to the increased volatility and flammability of acetone at higher temperatures. Also, chemical process tend to occur faster at elevated temperatures, which can make the smoothing process harder to control. We realised this from experience. When we had tried this and forgot about the print for a few minutes and ended up with an acetone slurry.
All this makes hot acetone treatment more costly to scale up safely and for a relatively negligible trade off in time for our use case, we decided to focus on the cold (room temperature) vapour method.
Finishing Setup
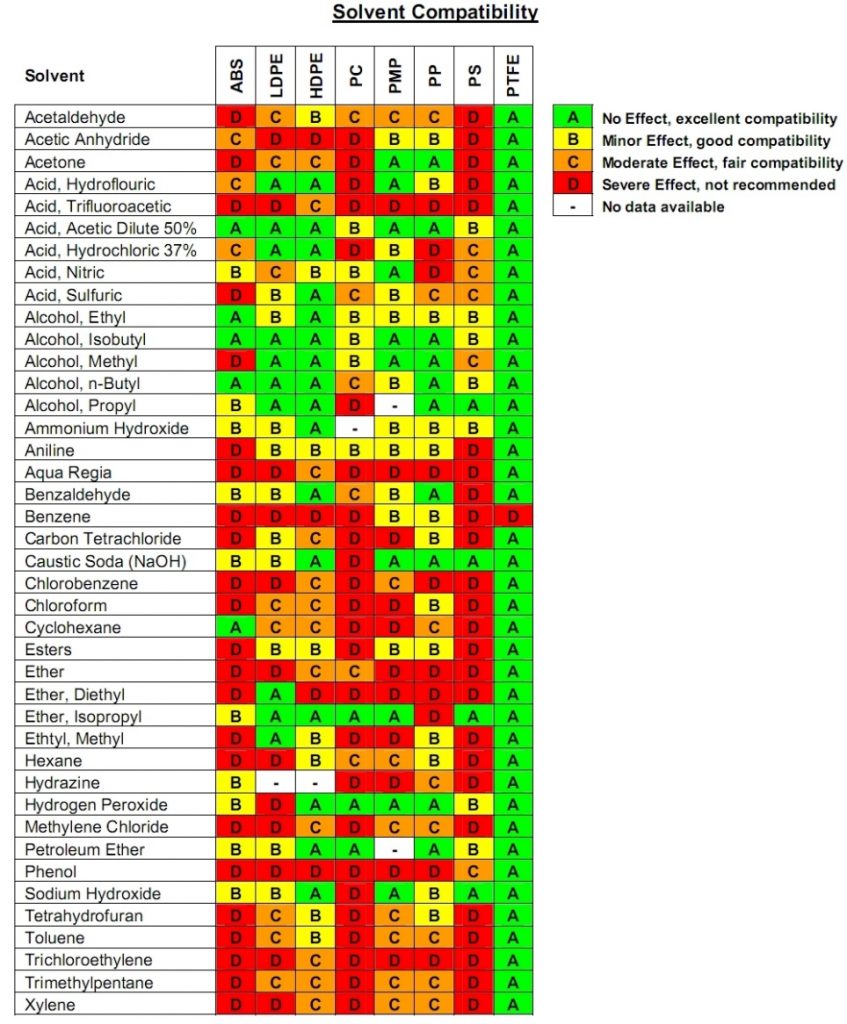
First things first, we had to find a container to use as our sample finishing chamber. Since the chamber would be in direct contact with the acetone solvent for extended periods of time, the material that the chambers are made of must be able to withstand the attack of acetone. Ideally this means a metal container if this is for long extended use but for the purposes of our tests, PTFE (PolyTetraFluoroEthylene) and PP (PolyPropylene) also do a good job. We made sure by checking with compatibility charts like the one below to avoid making a toxic mess.
Polypropyplene containers are great because you can find them in all sizes and with an airtight seal. Which was perfect for our needs.
We gave it a quick compatibility test with some acetone and didn’t get any serious deformation so we could move forward.
Samples can be held in the container in various ways. Some people have obtained good results by suspending the 3D printed parts, however suspending multiple samples would become complicated for us if scaled up so we opted to simply place them on a stainless steel tray in the container.
Test Prints Chosen & Print Settings
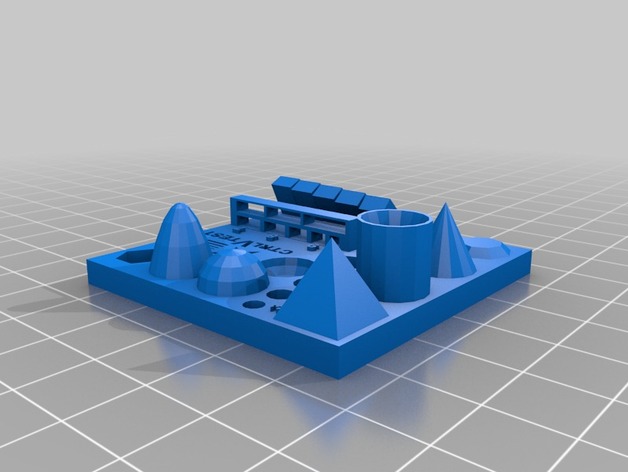
In order to learn about our process we needed to choose test prints which would give us useful information. After searching a while on THINGIVERSE, we decided on the following prints: CTRL-V TEST VERSION 1 (now available in VERSION 3 but we kept using version 1 for continuity). This provided a variety of shapes and features and fine details we could keep an eye on and measure. We also opted to print some simple CUBES which we could use to check whether the samples change size significantly and if so, whether there are any significant differences in what we see along the different print directions.

Printing
We did our printing on a Wanhao Duplicator 4X using 3mm ABS filament by Siridi using the Makerware slicer in MakerBot version XX. We kept the print bed at 110°C, 0.4 mm nozzle at 230°C and used a print speed of 110mm/s and infill of 10% both for speed of sample production and to test more delicate prints.