You asked, we answer. Reliable 3D printing experience – Magigoo.
Here at Magigoo we strive to ensure that you, the user has a smooth and reliable 3D printing experience. We do our utmost to make our products easy to use and to continually improve the performance and user experience of our products. We have included some information from your feedback and questions below. If this information still does not answer your questions, feel free to drop us a line at feedback@magigoo.com
1. The print is still warping what can I do?
There are several reasons why this can happen, these include:
- Using the incorrect settings – Magigoo® has an optimum temperature range where it offers the best adhesive performance – a guide on how to tweak your settings can be found here (3D Printing – Warping and its causes). If you want to learn more about 3D printer settings and how to avoid 3D print warping you can find more information on our blog posts (Temperature and first layer adhesion, Better settings, less warping and Perfect first layer)
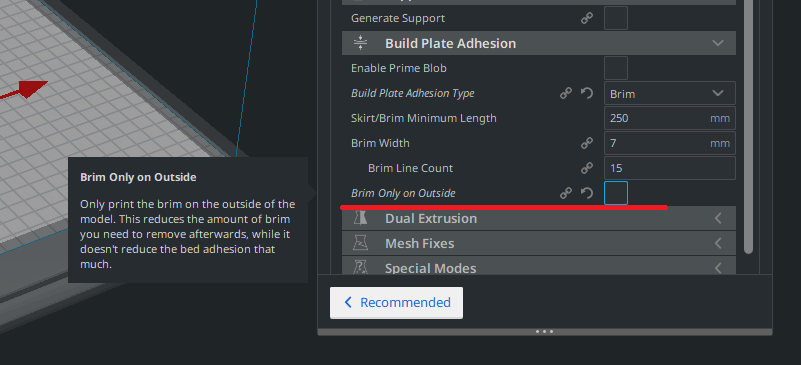
- Not using a brim – Some materials still require that a brim is used in combination with the optimum settings for best performance. In some instances, for example with Cura, it is also possible to use a brim on the inside perimeter of the part as well (Figure 3).
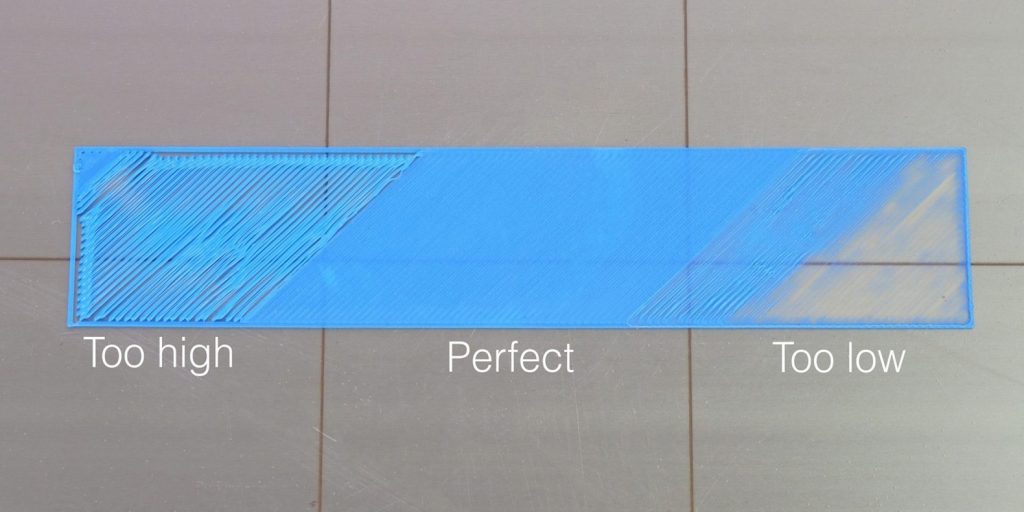
- Incorrect first layer height – if your nozzle is too far away from your bed or else way too close, the adhesion of your 3D prints will not be ideal.
- Using a cooling fan when you shouldn’t – some materials shrink considerably on cooling. It is good practice to keep the cooling fan off for the first 5 to 10 layers of your print.
- Using a first layer speed which is too high – Some materials such as ASA, PC and PP need some time to interact with the build-plate adhesive, using speeds which are too high can cause poor first layer adhesion. As a general rule we recommend 20 mm/s or lower for the first layer.
2. The part is stuck to the build-plate and I can’t remove it?
There are several reasons why this can happen depending on the material and printing parameters:
- Printing too close to the bed or with a very high material flow on the first layer, ‘pushes’ the material into the adhesive layer and/or the build-plate substrate. This tends to cause over adhesion which will make part removal very difficult.
- The material to adhesive combination does not ‘release’ on cooling. For example, TPUs, TPEs, some types of PLA, some types of Nylon and Glass-filled PP with Magigoo® PP-GF do not become easier to remove even upon cooling.
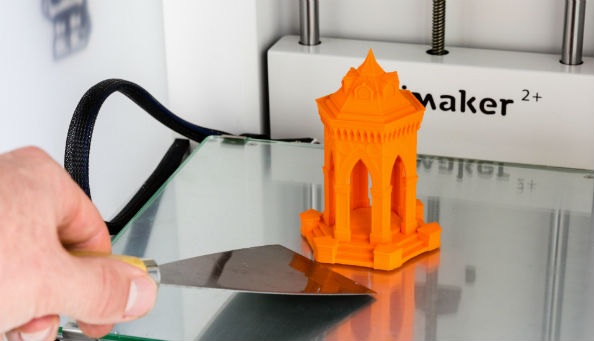
While it is tempting to grab a spatula and potentially convert your 3D printing space to an abattoir, there are several methods which can be used to safely remove a printed part which is too stuck to the build plate:
- Make sure that the build-plate is completely cooled down before attempting removal. Sometimes the temptation to remove a print is too high and one can easily forget that Magigoo® sticks when hot and releases when cold. A part removal tool (Figure 5) can be used if the part is partially detached or it can be easily and safely slid under the part, gentle tapping on the sides of the part can also help with the release of the part.
- If even after the print has completely cooled down, it is still stuck, one method to help with part removal is to use water. One can either wet around the part with water or else submerge the whole build-plate under water. If the part has a brim it is suggested to first peel off the brim from around the part before wetting the build-plate. The part should be easy to remove after 10 minutes, if not a spatula can be carefully slid underneath the part to introduce water to the areas which are still stuck or by submerging the part for a longer time. This method is a useful way to remove delicate parts, made out of flexible or soft materials.
- Glass filled PP parts printed on Magigoo® PP-GF work differently from regular materials. As the heated bed is deactivated after the first layer of printing, the build-plate is already cool. In order to facilitate part removal one can turn back on the build plate and heat it to a temperature of between 70 and 90 °C after the print is complete and remove the part when the build-plate is hot.
3. Magigoo® is not flowing out, the foam tip has dried up
- The Magigoo® pen has a spring-loaded valve in the applicator, this means that when applying Magigoo® the applicator has to be pushed against the print bed for it to be activated. Please also note that the seal of the valve has to be broken when the Magigoo® pen is first used, which might require slightly more force the first time. (Figure 6)
- Also note that after long periods of not being used or if the screw on cap is not used, the residual Magigoo® in the foam tip can solidify and clog the nozzle. This can be easily unclogged by wetting the foam tip with some water.
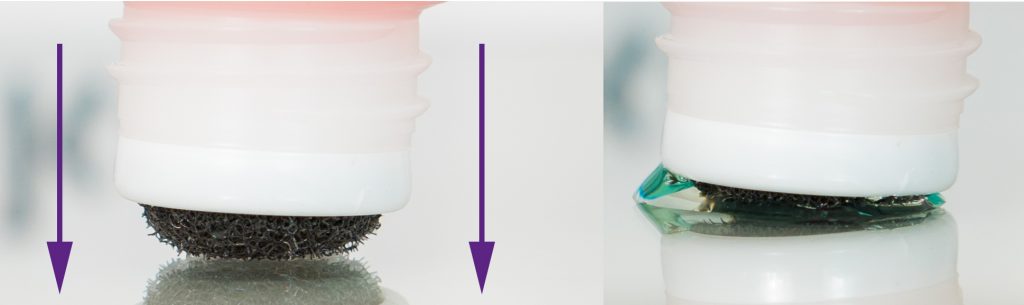
- DO NOT under any circumstance press the sides of the bottle with any more force than a gentle squeeze –if Magigoo® still does not flow out, a very light squeeze can be used to help the Magigoo® flow out. If you squeeze the bottle too hard, the applicator can pop out, followed by the contents of the bottle. (Figure 7 below)
4. Can I use the same layer of Magigoo®?
In order to achieve the best print results and the highest reliability when 3D printing, we always recommend to re-apply Magigoo before each print. This is especially so when using high performance materials such as PC, ASA, PEEK and reinforced Nylons considering the higher cost of a failed print and given that re-using the same application increases the chance of a failed print or glass chipping. A Magigoo® bottle should last well over 100 full size prints on a medium size printer and even longer if you apply only on the area which is going to be used for printing. This means that on average the cost of reapplying Magigoo® per print is less than $0.20, well worth it, when taking into account the material, time and energy cost for a single failed print.
Having said so, although we have never officially tested how long each Magigoo® type lasts with every filament, various users have reported that they have used the same Magigoo® application multiple times. With regular printing materials such as PLA the part removal process does not damage the adhesive layer much which means that it can be re-used. With other materials such as GF-PP the adhesive layer will be damaged on part removal and cannot be re-used. With materials such as PP and most Nylons, the layer can be used until it is visibly damaged.
With the low cost per print for Magigoo® better be safe than sorry and re-apply before each print. This will ensure the best results and help to prevent failed 3D prints, those relating to first layer adhesion at least anyways.
5. The foam on my applicator is damaged, what can I do?
In some cases, the foam application tip can wear off or tear. Please note that the lifetime of the foam tip is significantly reduced if you apply Magigoo® on a build-plate which is hotter than 40 °C. The lifetime of the foam tip is also reduced if the foam is dirty or glue is left to dry out on the foam tip. If for some other reason your foam tip is damaged please contact us on feedback@magigoo.com so we can look into the issue. In the meantime, Magigoo® can still be poured onto the build-plate by gently pressing the bottle whilst pushing the valve against the build-plate and can be spread to the required printing area using a sponge tipped brush, regular paint brush or even a paper towel.
6. How do I store Magigoo®?
Magigoo® is best stored upright, in a cool dark place. The screw cap should be tightly secured on the bottle when not in use and the applicator should be kept clean, free form any residual glue or dust.
7. Should I clean before applying Magigoo®?
Yes, make sure that the build-plate is free from dust, debris, previous adhesion products and oils. It is best to avoid detergents when cleaning your build-plate as these might interfere with first layer adhesion. Cleaning with water should be enough, however if water does not suffice, we recommend using ethanol or iso-propanol.

8. Which is the best way to apply Magigoo®?
Magigoo® is best applied on a clean, cold bed and re-applied to the cleaned printing area prior to each print.
- First shake the Magigoo® bottle vigorously for 5-10 seconds
- Carefully open the cap keeping the bottle in the upright position
- Inspect the foam applicator tip for any residue or damage (clean any residue from the tip if necessary)
- Invert the bottle and push the nib against the build-plate at one corner of the print area. Magigoo® should start flowing out when the valve inside the applicator is activated, if not a very gentle squeeze can be applied so that Magigoo® starts flowing out.
- Keeping the valve activated, apply the Magigoo® by moving the bottle in a to-and-fro motion to cover the whole printing area, horizontally (left to right).
- Then smooth out the adhesive layer by going over the printing area once more, without activating the valve. This time move vertically (from top to bottom). This also makes sure that you do not leave any missed spots.
- One can repeat the smoothing steps (alternating between horizontal and vertical to and fro motions) until the desired smoothness is achieved. A smooth Magigoo® application will give the bottom of the print a mirror finish (a rough application can show as a rougher finish at the bottom of the print).
- The Magigoo® layer will dry up before printing commences, in most cases the Magigoo® layer dries completely until the build-plate heats up.
- You can now print your part. Your 3D print will stick well during printing and should pop right off after printing when the bed cools back down.